
Mikrotik RB450G openwrt Installation
The Mikrotik RB450G is a high quality 10/100/1000 5 port router available in a steel case. Its a powerhouse small router with a 680 MHz MIPS processor, 256MB RAM and 512MB NAND flash. It has a serial port, SD card slot, will run from a 24V DC supply and is rated for -40 to +70 degrees C. They are designed to be used in some pretty challenging outdoor environments so they have to be robust. I've been using the RB450G for industrial applications and found them to be reliable. They ship with a proprietary Mikrotik OS that has a surprisingly full feature set for router applications. These routers give Cisco a run for their money at a fraction of the cost. The irony of the full feature set is that this router is difficult to learn for industrial applications: we simply don't need most of the features and their immense routing flexibility is not used for an industrial application.
Since The Mikrotik OS is proprietary and does not lend itself to modification or augmentation, I'd like to get an open source version of Linux running on this hardware to customize the RB450G for industrial applications. Following is the process I've used to get the open source Linux openwrt distribution running on the RB450G.

I'm following the openwrt build instructions found here:
wiki.openwrt.org/toh/mikrotik/rb450g
Update: I originally wrote this posting in 2014 when openwrt was at version 'Attitude Adjustment'. When you read this posting, you will see there were a LOT of steps to get openwrt installed on the RB450G back in 2014. As of November 2018, openwrt is at version 18.06.1 - and it is now remarkably simpler to install openwrt on the Mikrotik RouterBoards. I wrote an in-depth posting about installing V18 openwrt on the RB493G and that article is entirely applicable to the RB450G too. So continue reading this article if you would like to know how to install Attitude Adjustment openwrt on your RB450G, but if you would prefer to use a much newer, substantially simplified (V18) openwrt installation process, see this posting:
Installing Openwrt on the Mikrotik RB493G
My instructions here are Windows 7 oriented. The openwrt RB450G installation instructions you'll find elsewhere on the Internet tend to use Linux for most operations. I've been using Unix and Linux for 25+ years but my daily machine is my Windows 7 laptop. Virtually every form of Industrial software runs from Windows so that's my first line of defense for my paying jobs. My apologies to the Linux fans: I love Linux, but I'm really familiar with Windows 7 by virtue of professional necessity.
My main computer is a Windows 7 64 bit laptop with its maximum 8GB RAM and a 500GB flash drive. To build openwrt, I need a Linux desktop machine. The build instructions recommend Debian.
Step 1 - Install a Virtual Machine on my Windows Laptop
There are numerous virtual machines out there: VMWare, Windows Virtual PC, and VirtualBox are the three most common free versions that come to mind. The VMWare player license stipulates that it cannot be used for profit, the Windows Virtual PC is just for XP virtual machines, so that left me with VirtualBox.
The VirtualBox install was painless but time consuming. Its an Internet download. I went to www.virtualbox.org and downloaded the Windows amd64 version of VirtualBox.
One quick note about the version of software to get whenever downloading for the Intel processor that my laptop uses:
The correct image to get for my Intel processor is 'amd64': don't make the mistake of grabbing the 'ia64' version because that is for the incredibly rare and unique Itanium Intel processor. If you have any modern Intel or AMD processor, the 'amd64' distribution is almost guaranteed to be the version you want.
Step 2 - Install a Debian Virtual Machine in VirtualBox
Download the latest netinstall version of amd64 Bit Debian from www.debian.org/CD/netinst.
I used the netinstall version because its a small initial file size and I have a fast Internet connection to later allow the Debian installer (apt-get) to just upload all the packages directly during the first boot of Debian.
In VirtualBox, click on 'new' to create a new VM. I named it Debian64:

You may also notice from that screen capture above that I created a second virtual machine with the free 'parted' program in it. I needed that to keep making the virtual disk larger because I started off with the default 8 GB disk: if you just initially size to a 25 GB disk, you should be able to skip re-partitioning your drive when you run out of space during the openwrt build: less hassle, more time to pet the dog. Woof
The values I changed from the defaults:
- Increased the memory to 1024M (Faster?)
- Increased the disk size to 25 GB (The openwrt build is huge)
- Set the network up for a 'Bridged Adapter' to my laptop's wired Ethernet adapter (We'll need the VM on our same network as the laptop later when we install to the RB450G).
- Go into the System->General->Advanced Settings and turn on Bi-Directional Shared Clipboard and Drag'nDrop
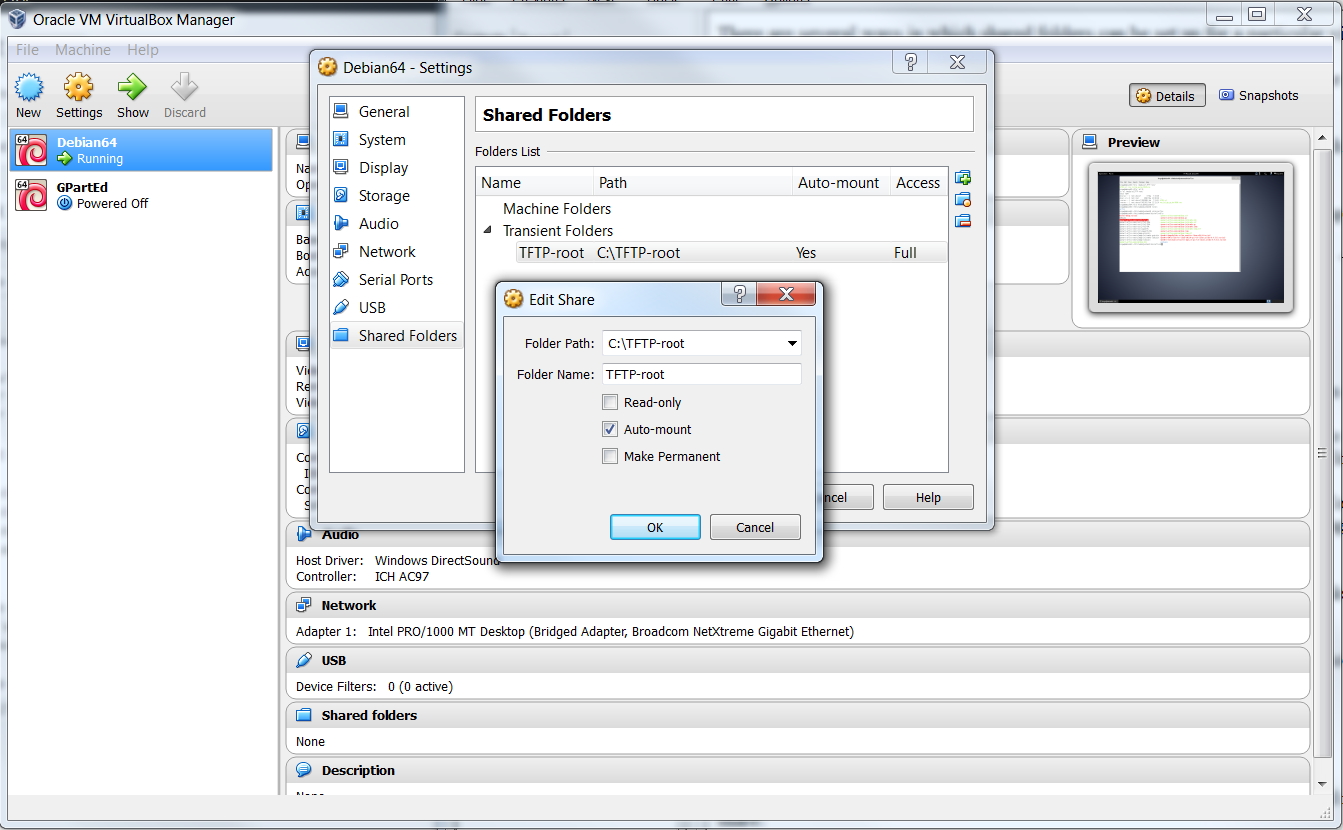
- Go into the Shared Folders configuration of VirtualBox to share the tftp folder between Debian and Windows. Create an auto-mounted shared folder at C:\TFTP-root with full R/W access
Step 3 - Install the VirtualBox Guest Additions Into Debian
Up to this point, we've been working within our Windows environment. Now its finally time to start work inside Linux. Fire up your Debian64 virtual machine and lets start having fun with Linux!
The VirtualBox Guest Additions is a software package to install in Debian that will enable smooth mouse support, video integration and the features that permit cut, paste and file sharing between Windows and Debian. Unfortunately, VirtualBox does not directly support Debian so we will have to build the Guest Additions from source. Welcome to the world of Linux 🙁
The following instructions can be found at virtualboxes.org/doc/installing-guest-additions-on-debian. Open a terminal Window in Debian (Applications->Accessories->Terminal) and enter the following commands:suapt-get updateapt-get upgradeapt-get install build-essential module-assistantm-a prepare
Click on Install Guest Additions… from the Devices menu, then runmount /media/cdromsh /media/cdrom/VBoxLinuxAdditions.run follow the instructions on screen.exit
We have a couple more housekeeping tasks to make our Linux life easier: we need to edit the /etc/group file and add ourselves to the sudo group and the vboxsf group. This will allow us to use the sudo commands (below) and automount the /media/sf_TFTP-root folder for our shared tftp files.cd /etcsuvi group vi editing fundamentals instructions belowexit
Once you get in the 'vi' editor above, search for the 'sudo' group line by typing /sudo, then arrow to the end of the line and append by typing a, add your user name, then press the Esc key. Search for the 'vboxsf' group by typing /vboxsf, then arrow to the end of the line and append by typing a, add your user name, then press the Esc key. Now type :wq to write the group file and quit.
Do not forget that shell exit command after you have quit out of vi. You shouldn't be a superuser in Linux any longer than necessary.
Reboot your Debian VM now to force all the changes to get updated. After reboot, you should see the /media/sf_TFTP-root contents, proving the automount is working.
Step 4 - Get the Source Code for the Attitude Adjustment version of openwrt
We'll need to run the Debian package manager to ensure we can get the correct versions of openwrt from the Web. I have not had much luck with the Debian graphical package manager so I just open up a terminal window and run apt-get. You'll want to install svn and git:su We need to be 'root' while installing packagesapt-get update Ensures you have the latest list of software versionsapt-get install subversion build-essential Installs the subversion source code control softwareapt-get install git-core Install the git source code control softwareapt-get install libncurses5-dev zlib1g-dev gawk Need these on Debian Wheezy for make to succeedapt-get install openssh-server So we can copy files from RB450G to Debian using scpexit Done with administrator stuff...
Now upload the Attitude Adjustment (12.09) version of openwrt:cd ~Go Homemkdir AttitudeAdjustment Our directory to install openwrtmkdir AttitudeAdjustment/packages Our directory to install openwrt packagesgit clone git://git.openwrt.org/12.09/openwrt.git AttitudeAdjustment Get all the openwrt sourcegit clone git://git.openwrt.org/12.09/packages.git AttitudeAdjustment/packages Wiki says get em. Don't know why yet...
Step 5 - Compile openwrt - Both Flavors
Verify you have all your packages needed to compile:cd ~/AttitideAdjustmentmake defconfigmake prereqmake menuconfig
Once you've verified all that works, upload an existing configuration file for the RB450G. That will save you the trouble of learning all the options to configure in the 'make menuconfig' that you ran above. Put this file at the top of your build directory (in ~/AttitudeAdjustment) and re-run 'make menuconfig'. Scroll down to 'Load an Alternate Configuration File' and load the file.
Then scroll to 'Target Images' and select 'ramdisk'.
This is some of the magic. There is a good reason this setting was not in the configuration file we loaded above: we're building this image to use just once. This ramdisk image is going to just run from the RAM on the RB450G long enough for us to get the permanent image loaded into the flash (called NAND) on the RB450G.
And now its time to compile our initial image:make
This will take quite some time.
When its finished you'll have a throw-away version of Linux that you'll use (just once) to initially boot openwrt on the RB450G over the network. We'll use the utilities in this Linux to copy a second version of openwrt into the flash (NAND) on the RB450G.
Take a look in your bin/ar71xx directory: you should find a file namedopenwrt-ar71xx-nand-vmlinux-initramfs.elf This is our network-bootable openwrt image.

Now its time to compile the 'permanent' version of openwrt that we will load into the NAND flash of the RB450G. We're going to remove that 'Target Images->ramdisk' from 'make menuconfig' that we ran above, then recompile. So run make menuconfig and reload the config.ar71xx_nand file using the 'Load an Alternate Configuration File' command in menuconfig. Now that we have the standard build configuration reloaded, compile our images again (don't worry about the initramfs image - it won't be overwritten by this new compile):make
This will be much faster than the original build since most everything has already been compiled. Take a look in your bin/ar71xx directory: you should find two files we'll be subsequently downloading into the RB450G:openwrt-ar71xx-nand-vmlinux.elf This is our permanent 'kernel' openwrt image.openwrt-ar71xx-nand-rootfs.tar.gz This is our permanent 'rootfs' openwrt image.
Step 6 - Backup the RB450G License Before You Overwrite Anything
Save your RB450G license and the current version of the software in case you want to get back to your original setup. We'll use the Mikrotik winbox app to save the license. So now we'll need an Ethernet cable plugged into any one of the last four ports on the RB450G: these are the default LAN ports on the RB450G.
I unplugged any other Ethernet cables from my laptop, turned off the Wifi, and plugged an Ethernet cable into Port 3 of the RB450G. Fire up a command window in Windows 7, then ask Windows 7 to give your PC (my laptop) a new IP address from the RB450G DHCP server by typing the following commands in my Windows 7 CMD window:ipconfig /releaseipconfig /renewipconfig
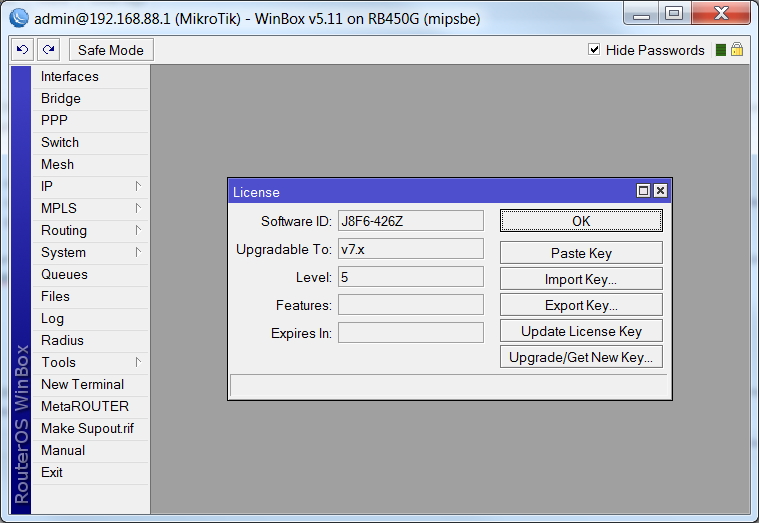
You should now see your Ethernet of your PC in the 192.168.88.x range: these are the default LAN addresses of an RB450G. In your browser, type in the gateway address to access the RB450G web page: '192.168.88.1'. Click on Winbox, install it on your PC, login with admin and an empty password. Go to System->License. Press 'Export Key' and save the license to your PC (my laptop).
If you do need to re-install RouterOS again, it is a fairly easy process to use Mikrotik's netinstall utility. Please refer to our post: Using Mikrotik netinstall to install RouterOS.
We're done running from the LAN port on the RB450G: disconnect the Ethernet cable from Port3 and reconnect your PC (my laptop) back up to the network. Re-run the ipconfig commands to get new IP addresses for your PC that are on your internal network (rather than the RB450G's LAN).
Step 7 - Decide How You're Going to Provide DHCP and a TFTP Server
To download the code to the RB450G we're going to need a DHCP server with PXE boot or BOOTP capabilities. We will also need a tftp server. In my case, I have Tomato running on a Buffalo WHR-G125 as my main connection to the Internet. I like Tomato: its simple, has a nice GUI, lets me track our internet usage. I use this Tomato router as my DHCP server. Tomato has provisions to handle PXE boot with DHCP so I'll use it here. If you don't use Tomato, I believe you can get the DHCP server and PXE boot running from your Windows 7 machine by using tftpd32. I've chosen not to use tftpd32 in order to avoid having two DHCP servers fighting with each other(Tomato and tftpd32).
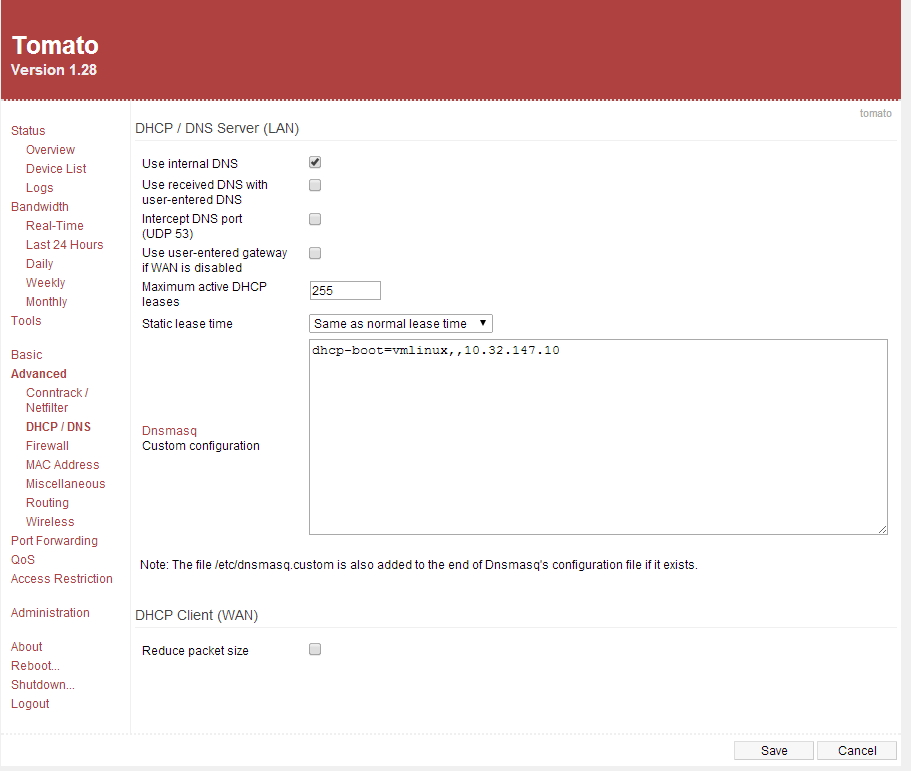
To enable the PXE boot in Tomato, login to the Tomato admin webpage and go to Advanced->DHCP/DNS. Enter this command into the Dnsmasq Custom Configuration box:dhcp-boot=vmlinux,,10.32.147.10
The file named vmlinux is the ram image that we are going to download into the RB450G: it will be on the Windows 7 machine at C:\TFTP-root\vmlinux. The IP address 10.32.147.10 is the address of my laptop: I have set that up as a static IP in Tomato so my laptop IP won't change (since I'm running a tftp server from it).
For convenience, I'll run a tftp server on my WIN7 laptop to serve up the files over tftp. I'll build the ELF image in Debian and copy it over to the Windows 7 tftp directory I've setup in the Solarwinds TFTP server.
The number of computers, VMs, and processes used here is getting a little crazy:
- My Win 7 64 bit laptop is the root of my world. I have Tomato configured to always assign this laptop the same static IP address so as to simplify setup for the communicating devices.
- Debian 64 bit running as a VM under VirtualBox.
- Gparted 32 bit running as a VM under VirtualBox, pointing to the same .vdi disk as the Debian 64 VM. For when I need more disk space in the Debian64 VM.
- A Buffalo WHR-G125 router running Tomato is my main router to the Internet. It is my DHCP server for my network, including the RB450G's WAN port connection.
- Solarwinds free TFTP server running on Windows 7 to serve up the compiled RB450G images over Ethernet to the RB450G. This is configured to serve files from the folder C:\TFTP-root
- A Tripp Lite Keyspan USA-19HS USB-to-serial adapter (with Windows 7 drivers) to connect RS-232 between my Win7 laptop and the RB450G serial console port.
- Putty telnet client running on Windows 7 to access the RB450G console through the serial port.
- The RB450G connected via its Eth1/PoE (WAN) Ethernet port (to my network) and the serial port (to my Keyspan USA-19HS).
I'm using the serial port from Windows 7. So I use the free program 'putty' as my telnet serial terminal emulator. Prior versions of Windows included hyperterm to do the equivalent thing, but the hyperterm telnet client is no longer in Windows 7. Putty is available here.
When I plugged the USB of the Keyspan USA19HS USB/serial adapter into my Windows system, I noticed it installed the serial port at COM3. If you didn't notice the com port during installation, take a peek in Control Panel->System->Device Manager->Ports(Com & Lpt) to determine which com port to use from Windows. Then I fired up putty and set it up for COM3 115200,N,8,1. When I press return, I get the RB450G console port prompt for login (yay). If it does not work, you may need a null modem adapter to get the RS-232 RCV/XMIT signals on the correct pins (2 & 3). The default login is admin with no password. So now I have the serial port talking to the RB450G.
Step 8 - Copy the Compiled RAM Image, Kernel, and File System to Installation Folders
Go to the Debian command window and navigate to the ~/AttitudeAdjustment/bin/ar71xx directory. Copy the ram image file to the Windows C:\TFTP-root folder and the two permanent image files to the Debian /tmp directory. We rename the ram image file to vmlinux when we place it in the tftp folder.cp openwrt-ar71xx-nand-vmlinux-initramfs.elf /media/sf_TFTP-root/vmlinuxcp openwrt-ar71xx-nand-vmlinux.elf /tmpcp openwrt-ar71xx-nand-rootfs.tar.gz /tmp
Step 9 - Start the TFTP server
Start the SolarWinds TFTP server application. Go to the General tab under File->Configure. Verify that Storage is set to C:\TFTP-root.
Press the Start button to start the TFTP service.
A quick review now:
- Our Windows 7 laptop (at 10.32.147.10) is running a tftp server ready to serve up the file 'vmlinux'.
- Our Debian VM is running an openssh server ready to serve up the kernel image and file system image from the Debian /tmp directory.
- Our DHCP server (Tomato at 10.32.1471.1) will create an IP address for the RB450G Ethernet plugged into Eth0/Poe/WAN port of RB450G.
- The PXE boot feature of the dnsmasq server on Tomato tells the RB450G to look for the file named 'vmlinux' on the tftp server.
- The RB450G will get an IP address from the DHCP server when it boots and ask the DHCP server the name of the network boot file and tftp server IP address.
Step 10 - Configure the RB450G to Boot from the Network using DHCP
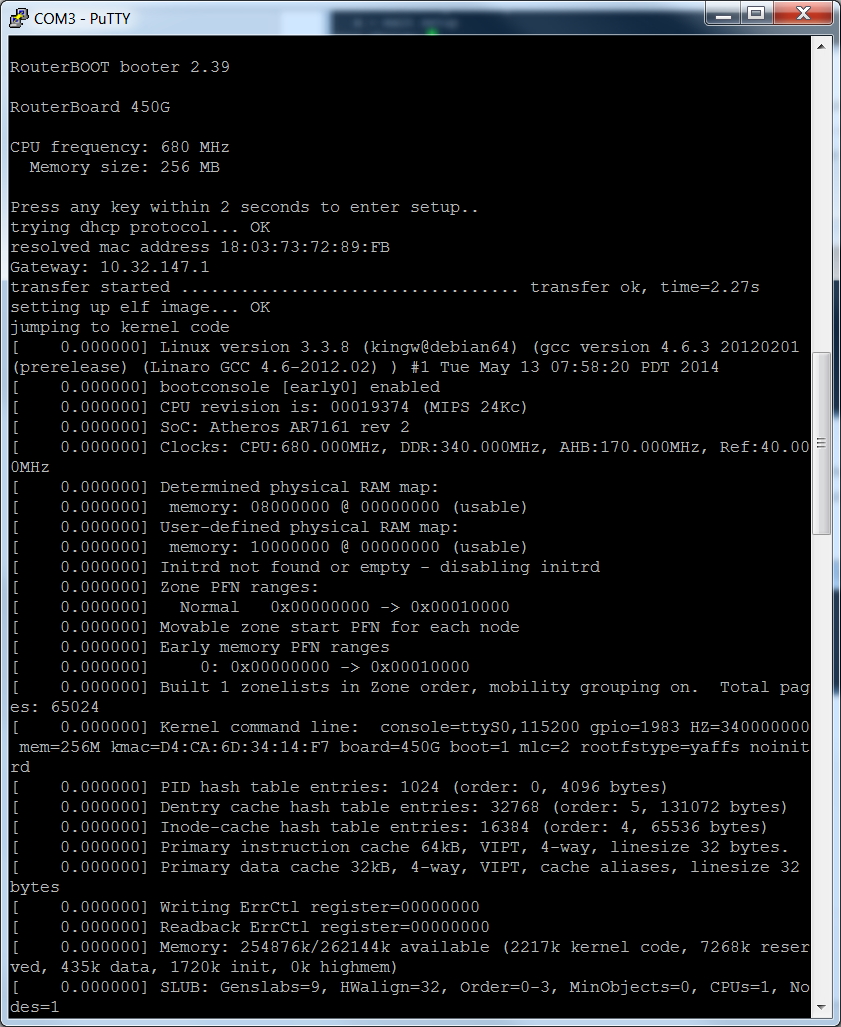
Its time to reboot the RB450G and take a look at the boot prompt screen using Putty from Windows 7. You'll have a couple seconds to press any key after the reboot. Here we are in Putty after we pressed a key within a couple seconds of the RB450G bootup:
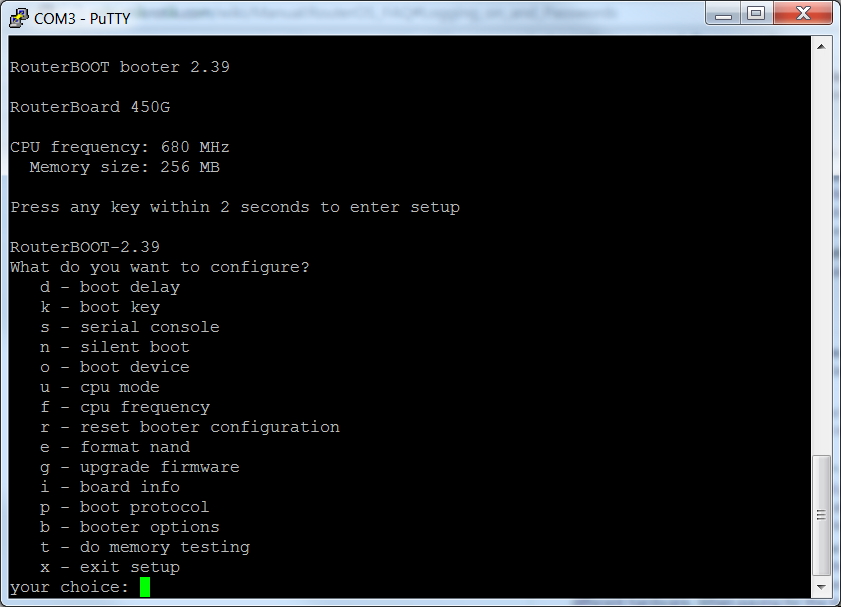
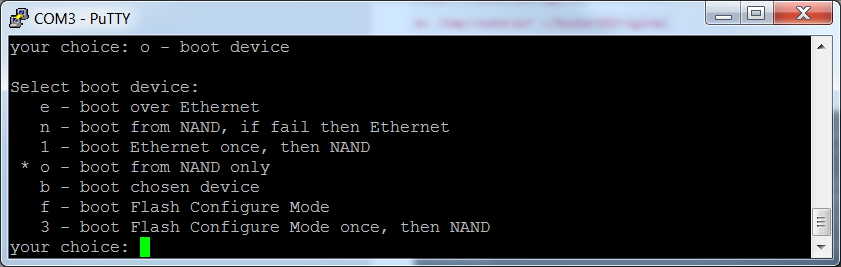
Now we want to convince the RB450G to quit booting from its flash (called NAND) and instead boot from the Network. Press 'o', then 'e'. Press 'o' again to see if you were succesful at getting the Ethernet selected as our boot source: we should see the 'e' as the highlighted selection. The Enter key will exit this submenu.

And we also want the RB450G to use DHCP (PXE boot) instead of BOOTP when it is booting from the network. Press 'p', then '2'. Press 'p' again to verify your success. The Enter key will exit this submenu.

Press 'x' (exit setup) to save your settings and reboot the RB450G.
Now the RB450G is patiently waiting to boot from the network. If all is configured properly you should see the transfer of the vmlinux start. If it does not, you can press the Esc key in the console window to force the RB450G to restart the download.
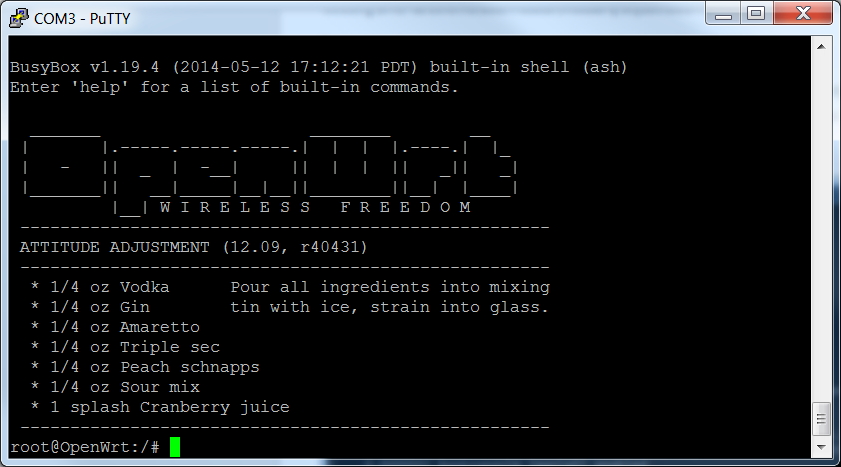
And we end up at the openwrt Welcome Screen:
Step 11 - Backup the Original Mikrotik Kernel and File System Before We Overwrite Them
Just in case we want to go back to the original Mikrotik OS, lets save the data from the original images.
Earlier, we enabled the openssh server on Debian. Ssh will allow us to use the Linux scp command to copy files from the RB450G to our Debian machine. To determine the IP address of our Debian machine, type the following command into a Debian terminal window:/sbin/ifconfig This will give us the IP address to substitute for some.remote.machine in the commands below
Go to the Putty RB450G console window and type the following commands:cd /tmpdd if=/dev/mtd5 | gzip > routeros_kernel.img.gz Small - should take a minute or sodd if=/dev/mtd6 | gzip > routeros_rootfs.img.gz Large - will take quite a whilescp routeros* user@some.remote.machine:/tmp The 'user' must be your Debian login name
Back in the Debian terminal window:mkdir ~/RouterOSOriginalmv /tmp/routeros* ~/RouterOSOriginal
Step 12 - Flash the RB450G

There are two mtd (flash) partitions listed above that we are about to overwrite: the kernel and the rootfs. From the RB450G console:
cd /tmpscp user@some.remote.machine:/tmp/openwrt\* .
mtd erase kernel
mount -t yaffs /dev/mtdblock5 /mnt
cp openwrt-ar71xx-nand-vmlinux.elf /mnt/kernel
umount /mnt
mtd erase rootfs
mount -t yaffs /dev/mtdblock6 /mnt
cd /mnt
tar xpzf /tmp/openwrt-ar71xx-nand-rootfs.tar.gz
cd /tmp
umount /mnt
Step 13 - Reconfigure the RB450G to Boot from NAND
Don't forget to finish up by going into Putty on your Windows 7 machine, reboot the RB450G and reconfigure the RB450G to boot from its flash:
Hey,
Thank you for putting together this guide. I've been trying to get through this Mikrotik issue for the last few months, to flash it with Openwrt. I tried following your guide (forgive me as i'm a bit new to this whole thing), but on step 5 i'm having an issue making an image as I dont see that option anywhere. I loaded the file which was linked, but nothing changed afterwards and no 'make' option to create an image exists. Perhaps, I'm doing something wrong, what that might be or is there a step in between? Thank you for your help and time ahead.
Sounds like your prior git failed so you don't have a copy of AttidudeAdjustment in your Debian box.