We run a small Bed and Breakfast out of our house - or actually a couple vacation rental Suites since we don't offer the breakfast part of the B & B. I'm no cook :-), just a techno-geek who has thoroughly enjoyed meeting the friendly guests that have stayed in our home.
When we show our guests around, 100% of them have asked 'What is the WiFi password?' Every group of guests, of every age, has asked this question. No kidding: 100%. As an aside, our vacation rentals don't have phones: we rely on guest cell phones. So far, not one comment or question about the lack of phones. Its fair to say the world is now mobile - at all ages.
So figuring out a way to set up a guest WiFi network is de-rigueur for a vacation rental host in today's world.
My first attempt at setting up a guest WiFi network was easy and inexpensive. I ran Cat5E wires to each level of the house, put an Access Point at each level, and installed a switch to feed wired Ethernet to each Access point. I plugged those into my router and had a functional house-wide Wifi network in no time.
About This Series of Articles
This article is one of a multi-part series on setting up a segregated Guest Network, including a guest WiFi network, within a Home Network. It is essentially an introduction to Virtual Local Area Networks ( VLAN), provides a simple use case for VLANs and gives a complete set of recommended hardware plus details the setup of that hardware.
The series of Guest Network articles progresses as follows:
- We select a set of low cost hardware to meet our criteria of creating a Guest Network, including Guest WiFi, within our Home Network.
- We go into some detail why we use VLANs and a managed switch. Understanding VLANs is key to understanding how to build a guest network.
- We set up the TPLink TL-WA801N WiFi Access points. This is a very simple process where configure each AP onto our Home Network and configure the AP's WiFi to operate on our separate Guest Network VLAN.
- We set up our managed switch, a Cisco Linksys SG300-10P, to send Home Network traffic to only the Home Network devices and Guest Network traffic to only the Guest Network devices. And we show the special case of mapping the Guest Network Access Points onto both networks simultaneously.
- We begin preparing our main router, a TPLink TL-WR1043ND, to create and manage the VLAN traffic for our Home Network and our Guest Network. Since the WR1043ND does not come with 802.1q VLAN support out of the box, this article is where we install openwrt on the WR1043ND.
- Lastly, we configure openwrt on the TPLink TL-WR1043ND to create and manage all the VLAN traffic.
In this article of the series, Part 1, we identify the hardware we purchase to allow us to create a Guest Network with WiFi.
Problems With Having Access Points on My Home LAN
1) Security. I was not keen on having guests on my internal network that feeds my PCs, laptops, phones, tablets, BluRay, ... I wanted to ensure the guests cannot bring in a virus to affect my network computers or access information from my computers - so I wanted them on their own network.
Honestly, it gave me the creeps to know my taxes and personal financial information were on a network PC that was accessible by my well-intentioned guests! Who knows what kind of nasty, unknown, undetected virus they were bringing onto my network with the devices they brought from their homes.
2) Power for the remote Access Points. When we remodeled, we ran Cat5E throughout the house, but the ideal location for each Access Point does not always have a 110VAC power plug near the Ethernet jack.
Technologies To Put Guests on a Private WiFi Network
1) VLAN. VLans will ensure complete segregation of the guest network. The buzzword here is 802.1q. We will use a router and switch that fully supports 802.1q to create the separate guest network without running any new Ethernet wiring.
2) Power Over Ethernet. A PoE managed Ethernet switch will allow each Access Point to be powered directly from the switch: no 110VAC needed near the Access Point. The buzzword here is 802.3af (original low power PoE) or 802.3at (newer high power PoE). Our switch will need to support 802.3af so we can power each Access Point remotely from the Ethernet switch.
Devices Purchased
The following devices were low cost, yet had excellent reviews at the time of this installation (February 2015). The devices were selected to ensure they support the technologies needed: 802.1q VLANs and 802.3af PoE. I spent just under $500 total with PoE. Without PoE, the total cost is around $200: quite a bargain to get whole-house WiFi with a secure, separate guest network..
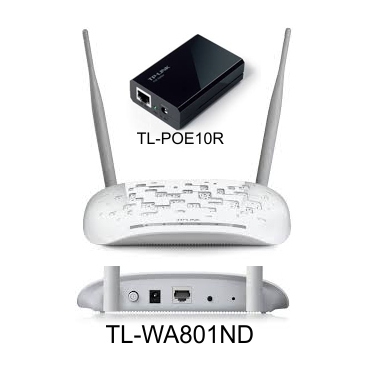
1) TPLink TL-WA801ND Access Points. Quantity two. About $52 each. I installed one for WiFi coverage of the upper house level and the second Access Point for WiFi coverage of the ground house level. The main level of the house receives WiFi coverage via a third device: a TPLink TL-1043ND WiFi router (my Internet-connected main router). Now I have WiFi radios on each of the three levels of the house to assure excellent WiFi coverage everywhere. The stock TPLink firmware of the WA801ND supports 802.1q WiFi VLANs using a feature called Multi-SSID.
Update: I tried using these TL-WA801ND Access Points for about a year and made a point of upgrading the firmware whenever TpLink released new versions. But these were NOT reliable: each of them would crash and lock up every few days to few weeks. This was totally unacceptable for our Bed & Breakfast since these access points seemed to sense when I was out of town, not available to bring them back to life. I needed RELIABLE hardware and these did not fit the bill.
I have since replaced these TL-WA801ND AP's with multiple ZyXel NWA-1123 AP's and there is a night and day difference in reliability. Not one crash in over two years time with the ZyXel Access Points. The ZyXel AP's also easily support the VLAN configurations and (true) PoE described throughout these documents. The Zyxel AP's include both 2.4GHz and 5 GHz radios: they support 802.11 a/b/g/n/ac instead of just 2.4GHz b/g/n. Definitely more expensive than the TpLink AP's, around $100 each instead of $55 each ($35 for TpLink AP plus $20 for TpLink PoE Splitter), but I need equipment that works!
2) TPLink TL-POE10R PoE Splitters. About $20 each. Quantity two. This device regulates the 802.3af PoE (48VDC) Ethernet from my PoE Switch to the required 9VDC of the TL-WA801ND Access Points and provides the power connector cable to operate the TL-WA801ND directly from my Ethernet wiring. Each Access Point therefore requires no nearby AC power plug.
Update: Not needed with the ZyXel NWA-1123 Access Points since the ZyXel AP's support PoE directly without this somewhat kludgy adapter.
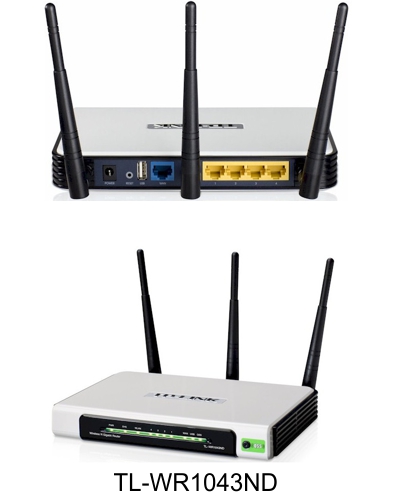
3) TPLink TL-WR1043ND Wifi Router. About $50. This is a dual band (2.4GHz/5GHz) Wireless N Router with four gigabit Ethernet LAN ports and a gigabit WAN port. By replacing the stock firmware with openwrt, this router fully supports 802.1q VLANs. A full 802.1q implementation is required to make the VLANs work properly for my configuration: we'll make use of this router's ability to put untagged frames and tagged frames on the same port simultaneously.
Please note: if you purchase the V2.X TPLink TL-WR1043ND, it uses a different switch chip which does NOT yet (as of Feb 2015) have a 'Stable' build of openwrt available with 802.1q support. These series of articles assume you have purchased V1.X hardware, as depicted above. If you instead purchase V2.X hardware, you may need to build openwrt from source which is a task not covered in these articles.
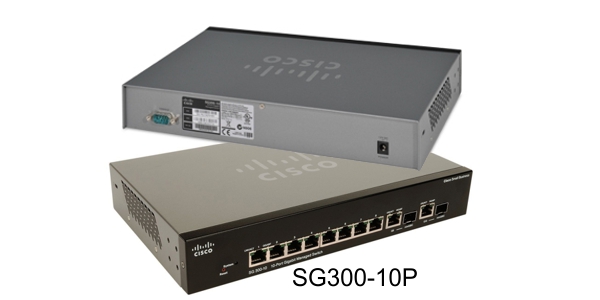
4) LinkSys SG300-10P Gigabit managed PoE Switch. About $280: ouch. A newer option for a gigabit managed PoE switch is the Linksys LGS308P: 8 ports gigabit PoE (instead of 10), but also supports the higher power 802.3at PoE and is available for about $140. The SG300-10P managed switch fully supports 802.1q VLANs. This switch is fanless: no need to listen to liftoff of the space shuttle here! Why spend so much money on the switch? You can spend less: see the following list of features we'll need.
Switch Features For a VLAN Segregated Network
- A managed 802.1q VLAN capable switch. Each port is individually configurable to be in a tagged and/or untagged VLAN. This means the switch must be 'managed' or 'smart': an unmanaged switch does not have the ability to map VLANs to ports. When purchasing your switch, make sure it supports simultaneous tagged and untagged VLANs on the same port: this will simplify your setup and maintenance, IMHO.
- Gigabit ports. I wanted to be able to transfer files between computers at maximum speeds so I opted for a switch with 10/100/1000 ports. Prices of gigabit managed switches are now so low that it is simply not worth considering buying a 10/100 managed switch.
- PoE. I don't have 110VAC power near my Access Points. So the switch needs to provide the power to run my Access Points, Cameras, and VoIP telephones. There are two relevant PoE standards: the original lower power 802.3af (suitable for most PoE devices) and the newer higher power 802.3at (needed for some PTZ cameras and such). You could skip purchasing a PoE switch and save a lot of money: gigabit managed switches (no PoE) are available for around $50. So I'm basically forking over about an extra $90 (for a LinkSys LG308P) to purchase PoE because I don't always have 110VAC near my Access Points, Cameras, or VoIP telephones.
- Fanless. A noisy switch is no fun if its in your office. PoE can require lots of power - meaning lots of heat - so if you need more ports (and therefore a switch with a fan), it might be better to put your switch in a remote location where you don't have to listen to the beast.
Update: after having PoE for a few years, it has been a very worthwhile addition since we now have 3 PoE Access Points to ensure excellent coverage inside and outside our Bed & Breakfast, two PoE VoIP telephones, and a PoE PTZ camera. The VoIP phones save us a LOT of money on our phone bills (less than $5/month total for our two desk phones using voip.ms), so the PoE has been incredibly convenient and cost effective.
What's Next - Creating Our VLANs
In the next part of our series, we'll discuss LANs and VLANs. We'll draw a simple network diagram to show how we'll use a VLAN to separate out our guest traffic. And we'll go over the reasons why a managed switch is so useful, and frequently necessary, when using VLANs.
Next Article: Why VLANs
Articles in This Series:
- Guest Wifi Network - Part 1 - Device Selection
- Guest Wifi Network - Part 2 - Why VLANs
- Guest Wifi Network - Part 3 - Setting Up the TPLink TL-WA801N Access Points
- Guest Wifi Network - Part 4 - Setting Up the Cisco Linksys Sg300-10P Managed Switch
- Guest Wifi Network - Part 5 - Installing Openwrt on the TPLink TL-WR1043ND Router
- Guest Wifi Network - Part 6 - Setting Up the TPLink TL-WR1043ND Router


Thank you for posting this series of blogs! I followed them closely, and was able to set up a guest network just like yours. My setup is for a house (main router,) and a detached garage with an apartment on the second floor (AP.) Some small changes I made:
- The wifi Router I bought is a TP-Link TL-WDR3500 (ver. 1.3). It's kinda old for 2018, but it supports a relatively new version of OpenWRT (15.05.1) and isn't too expensive.
- I did not buy a managed switch (I only have one AP, so it just went straight to the router.)
- The AP I bought is the same model, but a slightly newer version. I don't know if you had to do this, but I had to change the AP mode to 'multi-SSID' mode before I could add more wifi networks. It also comes packaged with a passive PoE injector.
- I have not manually changed any MAC addresses. I don't believe different VLANs using the same MAC addresses should harm anything, since the guest VLAN traffic is tagged (at least it seems that way for me. Right now I can't access my private network drive or personal devices while using the guest network, so it seems to be working OK.)
Other than that, I went step by step, and ended up with two working wifi networks set up exactly the way I wanted. Thanks again for writing all of this out!
Thanks for the note. Really nice to know these posts are helping folks out. The beauty of OpenWrt is that we all get the same user interface on different hardware, so it sure makes it easy to buy whatever hardware works for your needs and budget, yet benefit from all the documentation we can find across the Internet.
Keep those comments coming...